
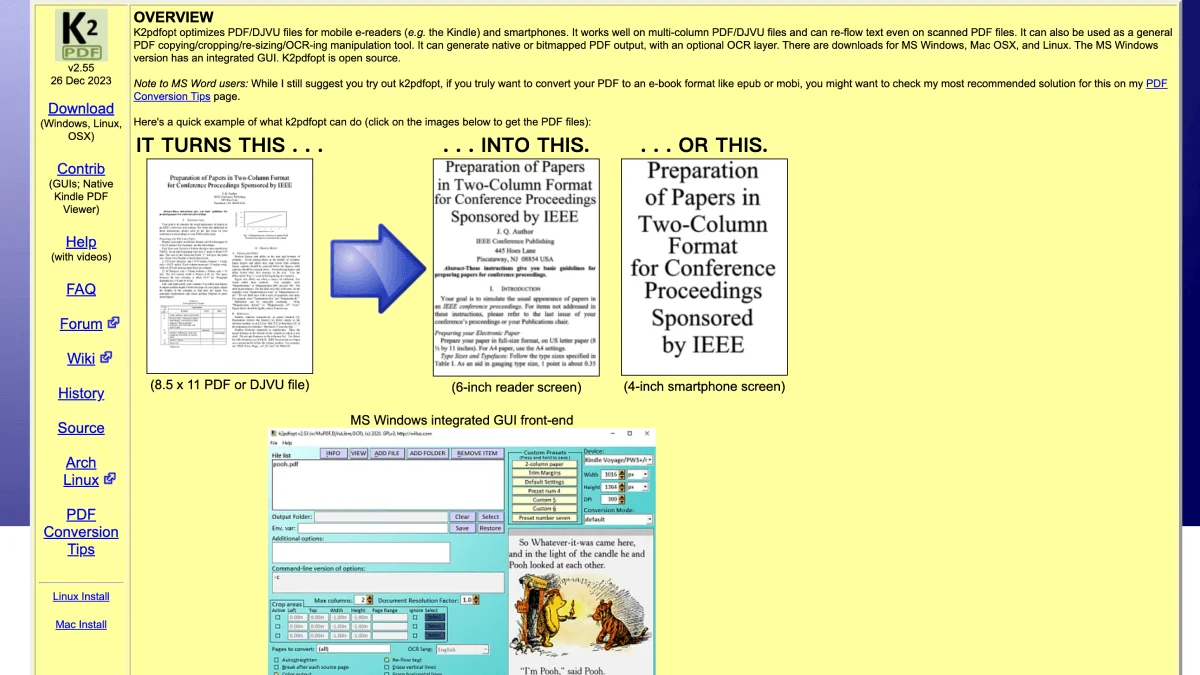
K2pdfopt is the most powerful PDF optimization tool for e-readers, and once you understand what it does, you’ll wonder how you ever read PDFs without it. It takes the kind of PDF that makes you pinch-zoom and scroll endlessly on a 6-inch screen and transforms it into something that reads comfortably on your Kindle, Kobo, or any small e-ink device. This guide covers everything from basic setup to advanced batch processing, including how K2pdfopt compares to the other tools in your PDF toolkit.
What is K2pdfopt?
K2pdfopt (short for “Kindle 2 PDF Optimizer”) is an open-source tool created by Willus.com that reflows and optimizes PDF and DJVU files specifically for small e-reader screens. Unlike a generic PDF converter that simply resizes pages, K2pdfopt intelligently analyzes each page to understand its layout — detecting columns, images, text regions, and margins — then rearranges the content to fit a target screen size.
The core capabilities break down into four main areas:
Multi-column reflow is where K2pdfopt truly shines. Academic papers with two or three columns of dense text are nearly unreadable on a Kindle without it. K2pdfopt detects column boundaries, extracts each column’s text in the correct reading order, and reassembles the content in a single-column flow optimized for your device’s screen. It handles irregular column widths and mixed layouts (text wrapped around figures) better than any built-in e-reader reflow engine I’ve tested.
Margin cropping strips away the excessive white space that plagues PDFs formatted for A4 or letter paper. K2pdfopt can auto-detect margins and crop them aggressively or conservatively, depending on your preference. This alone can make a substantial difference — removing half an inch of margin on all sides effectively increases the readable text area by 20-30% on a small screen.
Image and scanned PDF handling covers the documents that don’t contain selectable text at all — scanned books, photographed documents, and image-heavy PDFs. K2pdfopt can break these into readable chunks, apply OCR to make the text searchable, and adjust contrast and sharpness to improve legibility on E Ink’s limited greyscale range.
File size optimization is a bonus feature. By compressing images, downsampling resolution to match E Ink display capabilities, and stripping unnecessary metadata, K2pdfopt often produces output files significantly smaller than the originals — useful for e-readers with limited storage.
Download and Installation
K2pdfopt runs on Windows, macOS, and Linux. The Windows version includes a full graphical interface; macOS and Linux are command-line only.
macOS
brew install k2pdfoptWindows / Linux
# Download from https://www.willus.com/k2pdfopt/download/| Platform | Version | Source |
|---|---|---|
| Windows (GUI) | 2.52 | willus.com |
| macOS | 2.52 | willus.com |
| Linux | 2.52 | willus.com |
Basic usage — step by step
Windows GUI
If you’re new to K2pdfopt, the Windows GUI is the easiest place to start because you can see a preview of the conversion before committing.
- Open K2pdfopt and load your PDF by clicking “Browse” next to the source file field.
- Choose the output format — selecting PDF preserves text layers and works best for e-readers. The JPEG option creates image-based pages, which can be useful for image-heavy documents but loses searchability.
- Select your target device from the dropdown. Presets exist for Kindle (multiple generations), Kobo, Nook, iPad, and generic e-reader resolutions. Choosing the right device preset sets the correct screen dimensions, DPI, and margin defaults.
- Set the conversion mode. “Auto” is a good starting point for most documents — K2pdfopt will analyze the layout and decide how to handle columns and reflow. “Fit width” simply scales pages to fit your device’s screen width without reflowing, which is adequate for single-column PDFs with large fonts.
- Click “Preview” to see a sample page before running the full conversion. This is the most important step for getting settings right without wasting time on a full document.
- Click “Go” to process the entire PDF. The output file appears in the same folder as the original, with
_k2optappended to the filename.
Command line
The command-line interface gives you full control over every parameter. Here’s the basic syntax:
k2pdfopt input.pdf -dev kindle4 -m 0.5 -w 0 -h 0| Option | Description | Example |
|---|---|---|
-dev | Target device | kindle4, kobo, ipad |
-m | Margin multiplier | 0.5 (50% reduction) |
-w | Output width | 600 (pixels) |
-h | Output height | 800 (pixels) |
-ocr | Enable OCR | -ocr |
-col | Column mode | 1 (single), 2 (double) |
-dpi | Output DPI | 167 (Kindle default) |
The -dev flag is the most important one — it sets sensible defaults for your specific device. You can override individual settings afterward, but starting with a device preset saves you from calculating pixel dimensions.
Recommended settings for different devices
Different e-readers have different screen sizes, resolutions, and DPI. Here are tested settings for the most common devices.
Kindle Paperwhite (6-inch, 300 PPI)
k2pdfopt input.pdf -dev kindle4 -m 0.5 -dpi 300The Paperwhite’s high resolution means you can use relatively small margins and still get sharp text. The kindle4 device preset works for most modern Kindles because the screen dimensions haven’t changed radically.
Kindle Oasis (7-inch, 300 PPI)
k2pdfopt input.pdf -dev kindle4 -m 0.3 -dpi 300The Oasis’s extra inch of screen real estate means you can tighten the margins further. You can also experiment with -w 1264 -h 1680 for exact Oasis dimensions if the preset doesn’t feel right.
Kobo Libra 2 (7-inch, 300 PPI)
k2pdfopt input.pdf -dev kobo -m 0.4 -dpi 300The Kobo preset accounts for the slightly different aspect ratio. For the larger Kobo Elipsa or Sage, increase the DPI and reduce margins further.
BOOX (various sizes)
k2pdfopt input.pdf -dev kobo -m 0.3 -w 1404 -h 1872BOOX devices running Android have excellent built-in PDF readers with reflow (NeoReader on BOOX handles PDFs natively better than K2pdfopt’s output in many cases), but K2pdfopt is still useful for pre-processing PDFs you want to read on a secondary Kindle or for creating smaller files for storage-constrained devices.
When to use K2pdfopt vs Calibre vs Briss
These three tools solve related but distinct problems, and knowing which one to reach for saves time and frustration.
K2pdfopt is the right choice when you need to reflow multi-column PDFs for a small e-reader screen. It’s the only tool in this comparison that intelligently rearranges content to fit a different aspect ratio. Use it for academic papers, magazine scans, and any PDF where the text is too small to read comfortably on a 6-inch device.
Calibre is primarily an ebook library manager, but its built-in PDF-to-EPUB/MOBI converter handles straightforward, single-column PDFs well. Use Calibre when the PDF is clean, the layout is simple, and you want the result as a proper ebook format rather than a reformatted PDF. Calibre’s conversion preserves metadata and integrates with its library management. However, Calibre struggles with multi-column layouts, scanned PDFs, and complex formatting — those are K2pdfopt’s domain.
Briss is a PDF cropping tool that does one thing well: it lets you draw rectangles over odd and even pages to define crop regions, then applies them uniformly across the entire document. Use Briss when the PDF is otherwise readable but has excessive margins you want to remove. Briss doesn’t reflow text, so it’s best for PDFs destined for larger screens (tablets, BOOX devices) or for documents where preserving the exact layout matters. Briss is also useful as a pre-processing step — crop first with Briss to remove margins, then reflow with K2pdfopt for optimal results.
A practical workflow: for a difficult two-column academic paper headed to a Kindle, crop the margins with Briss first, then feed the cropped PDF into K2pdfopt with -col 2 for the reflow. The combination produces cleaner output than either tool alone.
Batch processing
If you have a folder full of PDFs, processing them one at a time through the GUI is tedious. The command line handles batch processing easily with a shell loop:
for f in *.pdf; do
  k2pdfopt "$f" -dev kindle4 -m 0.5
done
This processes every PDF in the current directory using the same settings. For more control, you can direct output to a separate folder:
mkdir -p optimized
for f in *.pdf; do
  k2pdfopt "$f" -dev kindle4 -m 0.5 -o "optimized/${f%.pdf}_opt.pdf"
done
The -o flag specifies an output path, and ${f%.pdf} strips the .pdf extension so you can append _opt to the filename. On Windows, use PowerShell or Git Bash rather than Command Prompt for the loop syntax.
Pro tips
- Test one page first. Use
-p 5to process only page 5 before committing to a 500-page document. Iterate on your settings with the preview until the output looks right. - Reduce file size. Add
-q 60for 60% JPEG quality on image-based pages. E Ink screens can’t display the full color depth of a high-quality JPEG, so you won’t notice the quality loss but you’ll see significant file size savings. - Enable OCR for searchable text. The
-ocrflag requires Tesseract OCR to be installed on your system. On macOS,brew install tesseracthandles this. On Linux, use your package manager. - Set custom DPI for sharp text.
-dpi 167matches older Kindles;-dpi 300matches the Paperwhite and Oasis. Setting DPI higher than your device’s actual resolution wastes file size with no visible benefit. - Use landscape mode for wide documents.
-ls 1outputs pages in landscape orientation, which can help with PDFs that have wide tables or diagrams. - Preserve the original’s text layer by avoiding the JPEG output mode unless you’re working with pure image scans. The PDF output mode keeps fonts crisp and text selectable.
Troubleshooting
| Problem | Solution |
|---|---|
| Output too small | Increase DPI: -dpi 200 or higher |
| Columns not splitting | Manually set column count: -col 2 or -col 3 |
| OCR not working | Install Tesseract OCR engine: brew install tesseract |
| File too large | Reduce quality: -q 60 or switch to greyscale output |
| Text garbled | Disable reflow wrapping: -wrap -1 |
K2pdfopt has a learning curve — the sheer number of flags can feel intimidating — but the default settings produce good results for most PDFs straight away. Start with a device preset and only tweak parameters when the output doesn’t meet your expectations. For the PDFs that truly resist optimization, the K2pdfopt forums at mobileread.com are an excellent resource where the developer and community actively help troubleshoot difficult documents.